digest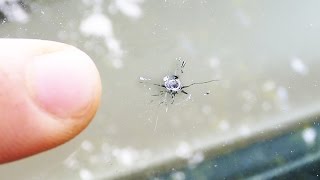
Short Summary
Main recommendation: Repair a windshield chip or small spider crack right away with a DIY resin kit, before it spreads into a larger crack. The host uses a $10 kit, cleaning with alcohol on a microfiber towel, a vacuum step to pull out air, a pressure step to force resin into the crack, and a UV-cure step in direct sunlight.
Key Points
- Act quickly: the host repairs the chip a couple of hours after it happened, to prevent further chipping or cracking across the windshield.
- A spider-shaped crack that does not run straight across the windshield is treated as repairable in this video.
- The vacuum step pulls trapped air out of the crack; the host says air bubbles visibly come out the backside of the glass.
- The pressure step forces resin into the crack, which the host describes as the key to filling it.
- Curing in direct sunlight speeds the process: about 15 minutes in sun versus about an hour in shade or on cloudy days.
- After curing, the result is a repair that leaves only a very small speck visible.
Details Worth Noting
- Concrete instructions:
- Clean the chip: pour isopropyl alcohol onto a microfiber towel (not directly onto the glass or crack) and wipe the windshield. Alcohol dries quickly; if using glass cleaner, also spray it on the towel, not the windshield.
- Prepare the chip: place cardboard behind the glass and black tape around the chip so it is easier to see while working.
- Clear debris: use a safety pin to make sure no glass fragments remain in the chip.
- Apply the seal: peel off one side of the seal so the tab faces up with the crack centered, make sure it seals well, then peel the other side.
- Attach the pedestal: line up the pedestal's tab at the top and press it down so it covers the chip.
- Load the resin: cut the tip off the resin, fill the syringe about three-quarters full, and push the plunger all the way in.
- Create a vacuum: hold the syringe down with one hand, pull the clip upward until it locks, and let it sit 10 minutes. During this time, tap the windshield to help air bubbles escape.
- Apply pressure: after 10 minutes, pull the base of the syringe to let air in, push the syringe back in airtight, move the clip down and lock it, and let it sit 20 minutes.
- Remove and cure: remove the syringe, peel back the seal with a safety razor (paper towel ready to catch resin), place a drop of extra resin on the crack in direct sunlight, cover with the flat yellow square, and press out bubbles with the razor edge. Cure 15 minutes in direct sun (about an hour in shade or cloudy weather).
- Finish: remove the square, scrape the resin flush with a straight edge held nearly parallel to the glass, being careful not to scratch the glass.
- The kit cost $10 in the host's example.
- The host says the crack should be fixed promptly so it does not grow into a large crack.
- The video does not address cracks that run straight across the windshield, which the host says are not repairable in this way.
Bottom Line
A chip caught early can be fixed cheaply at home with a resin kit, but the result depends on removing air, forcing resin in, and curing in sunlight, and the process only suits chips and short spider cracks rather than long straight cracks.