 digest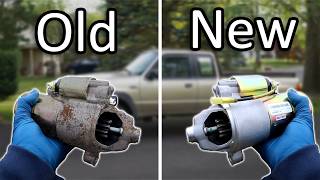
Intro
Hey guys! ChrisFix here! Today, I'm going to show you how to diagnose and replace a starter in your car or truck. In most situations, when the starter goes bad, it's completely random and there's no warning. For example, I got in my truck, I went to go start her up, turned the key, and she won't start at all! I just hear a click. So I have a feeling it's a bad starter, but it can be a couple of other things. So let me show you how to diagnose and make sure it IS a bad starter, and then I'm gonna show you how to replace the starter. So let's begin.
Why wont my car start?
Now there are four common problems, other than your starter, which could prevent your engine from turning over. You could have a dead battery, your anti-theft immobilizer might not be working, your neutral safety switch might be bad, or you simply have a blown fuse.
How to test your battery
So the first thing we want to check, and probably the most common reason a car won't crank, is the battery. You can check a battery really easily on your own with one of these multimeters. Just set it to 20 DC volts, grab the two leads, touch one to one post and one to the other, and you can see our voltage is almost 12.4. You want your voltage to be at least 12.2 or above. If it's lower than that, try charging your battery and seeing if the car will start.
Now testing voltage helps, but it doesn't tell you the whole story, because it doesn't put a load on your battery. So you could get yourself a load tester like this, which will test the cold cranking amps of the battery under a load. Cranking amps are the amps the battery could deliver to run the starter. In this case we want to look at cold cranking amps, which is 850. So we just put it to 850, hit enter, and now it tests the battery. Compared to the rated 850, we have 831 cold cranking amps, which is pretty close, so that's a good value. If this was significantly less, if this was like 600 or even 500, I'd consider getting a new battery. That could be why your starter isn't working.
Now this load tester is a great tool to have, and I'll be sure to link this in the description, along with any products and tools I use in this video, so you could easily find them. And if you don't want to go buy one of these load testers, most your local part stores will load test your battery for free, so just go ask.
Now our battery is good, so the next thing to check is each terminal. First, you want to make sure that the terminal is securely connected to the post. A tight connection here is important. Next, check the connection for any corrosion. Even if the corrosion doesn't seem bad, try disconnecting the terminal, sanding down the post with, like, 200-grit sandpaper, and don't forget the inside of the terminal as well. The slightest bit of corrosion could cause a bad connection, and that could prevent the starter from working. So make sure you keep those terminals clean.
Now there's one more thing I want to show you, and that's inside another car. If you go to start your car and you hear a rapid clicking sound, usually, that's a dead BATTERY, and NOT a bad STARTER. You can see the voltage is low, so just charge it up and then the car should start. So you always want to check your battery first. It's one of the most common reasons why your car or truck won't start.
Anti-theft immobilizer (theft light flashing)
Another common reason is the anti-theft immobilizer. Many cars today have chips in the key, which will prevent somebody from hot-wiring your car. Now if this immobilizer goes bad, you go to start your car, and it won't start. How do you tell if the immobilizer is bad? Well, you just go to the dash, put the key in the run position, and look for the anti-theft light. After a few seconds, it should go out, if it's working correctly.
So, since the anti-theft light went out, I know the chip in this key works and the immobilizer is working properly. But to give you an example of a bad immobilizer, or bad chip in a key, I made a blank of my key. If the immobilizer isn't working, it'll stay lit or flash rapidly. So that's how you tell if your immobilizer's not working, which could be a reason why your car's not turning over.
And since we're looking at the dash lights, I have one more thing I want to show you. It's not very common, but it's still worth checking: Put the key in the ignition, turn it to the run position, and make sure that your "Check Engine" light comes on. If your "Check Engine" light doesn't come on, that could mean the car's computer isn't working. And if the car's computer isn't working, the engine might not turn over. So, again, that's not as common of an issue, but it's something to look at, since we're already looking at the dash lights.
Neutral safety switch
But the next problem's a common reason why your engine might not turn over, and that has to do with your neutral safety switch. Now, I've done this before myself. Sometimes, on an automatic car, when you go to put the car in park, you end up not pushing it all the way into "Park," so it's in between reverse and park. And as a safety feature, the neutral safety switch will prevent your car from starting if it's not in neutral or park.
On automatic cars, the neutral safety switch is connected to the transmission. So just go underneath the vehicle. You can see the transmission pan is right here, and then right next to the transmission pan is the neutral safety switch. When you shift into gear, the neutral safety switch lets your car know what gear you're in. Now, a bad neutral safety switch will usually throw a "Check Engine" light. But one thing to check is to make sure your electrical connection is pushed all the way in, because they can loosen from all the vibration.
Now, that's for automatic cars. Manual cars are a little bit different. For a manual, even if you're in neutral, the car won't start. You have to press the clutch down, and that allows you to start the car. When you press the clutch, the clutch safety switch, which is connected to the clutch, is engaged, which allows the car to start. So make sure that the clutch safety switch looks good and is plugged all the way in. That's something you'll want to check on a manual car.
How to check fuses and starter relay
And the last thing to check before replacing your starter are the fuses and relays. If you aren't sure where your fuse box is for your starter, you could check your owner's manual. In here, you're gonna get a diagram, and it's gonna tell you exactly where the fuse is for the starter relay, and it's also going to show you where the starter relay is. We're gonna check both.
First, we're gonna check that starter relay fuse, which is right here, and make sure it's not blown. This is like checking any other fuse. Just make sure the connection's not broken in the fuse, and this one looks good. Although these fuses are a little bit different, if we put 35 amps across these, they pop, and that's what a bad fuse looks like. So we know our fuse is good.
Now we're gonna go check the starter relay, which is this one right back here. To test this, have somebody start the car, and with your finger on the relay, you should feel and also hear a click. This clicking usually means the relay is working, but to be sure, you could remove the relay and swap it out with another one. Now with both relays in, we could try starting the truck. Again, I could hear the click, but the starter isn't engaging. So we know the relay is good.
After checking the fuse and the relay and determining that they're good, we've checked many of the common problems that would cause a vehicle not to turn over. So I'm pretty confident that it's the starter that's bad.
Start car by hitting starter with hammer
And with that being said, there's one more thing, it's kind of old-school that I want to show you, and it's hitting the starter with a hammer to try to get the car started. So have somebody trying to start the vehicle as you're underneath, trying to hit the starter with a hammer. Ready? The engine starts and idles. So there you go! It's a good little trick that'll get you home, and now we also know that starter is definitely bad.
How to remove a starter
Now many starters are accessed from underneath the vehicle. My starter is underneath the engine. And some cars, like this Jaguar, the starter is located at the top. You can see the starter solenoid, and right below, that's the starter. So you could actually get access to the starter from the top of the motor; you don't have to go underneath. So you're going to want to figure out where your starter is located.
In this case, I need to safely jack up my truck. Be sure to rest the weight of the vehicle on the jack stands, just like that. Then I like to leave the jack slightly touching the frame for some extra protection. With the vehicle safely supported on jack stands, I like to come over and give it a good shake, make sure it's nice and solid, and it is. So now let's go remove the starter.
Replacing the starter on most vehicles is fairly simple. All you need are some common hand tools. I always start off with some safety glasses because we're working underneath the vehicle, and need a good socket set with some extensions, a couple of wrenches, and then some threadlocker for when we install the new starter. So let's begin.
Before we start removing the starter, the first thing you want to do is disconnect the battery by removing the negative lead so that there's no power going to the starter. Now under the truck, we're moving towards the front of the truck, passing the transmission pan, the cat, and ending up at the oil pan. To find your starter, you're gonna want to find where the engine and transmission meet, because that's where the flywheel is, and the starter engages the flywheel to spin the engine. So if we look closer, the starter is right here.
I'm gonna loop around to the other side for a better view of how it's bolted in. There's a bolt here, a bolt here, and a bolt back there. That's all that holds in the starter. Since there isn't too much room to remove these bolts, I'm gonna be using a ratchet with a swivel head. Let's get all three bolts removed. They give you just enough room to get the ratchet and your fingers in there to get the bolt out. Let's get the bottom bolt next, which has more room than the last bolt. That's the second bolt, and now we have one more bolt all the way up at the top.
It's gonna be tough to get to that one, but there's a trick. Use a universal joint with an extension. The U-joint extension can be pretty loose, so a little trick is to use some black tape to limit its motion. We'll snake that socket back there and loosen the bolt. Since this is the last bolt holding the starter in, as you remove it, make sure you hold the starter so it doesn't just drop, because it's pretty heavy. There we go.
Now I'm gonna rotate the starter so we can get access to the wires. Before we remove the wires, just note where the wires go. In this case, there are two different size wires, one here and one there. Sometimes the starter isn't actually bad; rather the connection is bad, because it's all corroded. So you could always try taking the wires off, cleaning the connection, and putting them back on, and the starter might work. But the connection here looks good, so let's remove the wires.
We have the smaller nut first, which is a 10 mm. Get that wire off there. Then the larger nut, which is a 12 mm, and get that wire off. This is a tight fit, but with a little bit of wiggling, the starter is out.
How to test a starter
Now this is out, let's go to the parts store and get the new starter. Be sure to bring your starter with you, and I'm gonna show you why. I'm at my local AutoZone, and they could actually test the starter to see if it's bad. What they do is hook up the starter to their tester, connect some wires, and then test it out. And just as I figured, the starter is bad. Besides bringing your starter in to get tested for free, it's important to bring it, because when you get your new starter, you can hand over your old starter so you don't get over-charged. Thank you, AutoZone, for supporting the video and letting me film in the store.
How to install a new starter
Alright, so now back under the truck, we can install our new starter! Before we put this back in, we want to clean the wires that are gonna attach to this so we have a good electrical connection. Use some sandpaper and sand away any of the corrosion. This looks good, so let's do the other wire as well. Now, with both wires prepped, let's squeeze our starter back into place. Good.
Installation is simply the opposite of removal. First, connect the two wires. The other wire is shorter, so we have to move the starter to get the wire over the post. Then tighten it down. Next is an awesome trick that prevents corrosion and keeps the starter running great, and that's using silicone paste on the wires we just tightened down. Silicone's an electrical insulator, and it's hydrophobic, so it prevents water from contacting the posts and wires on the starter, so they'll stay corrosion-free. So give the exposed metal wires a light coat of silicone.
Now we can bolt in the starter, so let's spin it around, push it in, and line up the bolt holes. With the starter lined up, grab your three bolts, and we want to use some removable threadlocker on these. Threadlocker not only prevents the bolts from loosening due to vibrations, but also coats the threads, which will help prevent corrosion. Use a little bit on the ends of the threads, then start with the easiest bolt to get to, the bottom one, and start threading the bolt into the starter. Once you have the thread started by hand, tighten the bolt down most of the way, but leave it loose enough so that you can align the other two bolts.
Now, tighten the next easiest bolt, which is the middle one, and you can see how we're putting a swivel ratchet to good use in these tight spaces. Finally, we have our universal joint and extension for the last and hardest-to-reach bolt. Get it in place and tighten it down completely to 20 ft-lbs. Now we're gonna torque down the other two bolts. That's one, and that's the other. Now all three bolts are torqued, the wires are connected, and the starter is completely in. Like I said, the job is relatively easy. It all depends on where your starter is. The hardest part with this is just having enough room in this area. Which is why having the right tools makes the job go THAT much easier.
Starting the truck
Now, it did get dark out, so I'm gonna kill the lights, and we're gonna start her up in the morning. And it's a good thing we got that done yesterday, because it snowed. So let's go pop the hood and get that negative terminal on there. Make sure that's nice and tight.
With the battery connected, let's go start up the truck. I don't know about you guys, but this is always my favorite part whenever you fix something, going to start her up, see if she works. Moment of truth. The engine cranks, then starts. All right! That's what I'm talking about! That starter sounded nice and strong, and she started right up with no strange noises.
And that's how you replace a starter. As always, hopefully the video was helpful, and if it was, remember to give it a thumbs up. I want to hear your starter-changing stories, from the easy ones to the tough ones. So make sure you leave a comment below. Plus, if you aren't subscribed, consider subscribing. And finally, all tools and products I use in this video are listed in the description.