 digest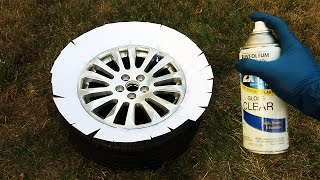
Short Summary
Main recommendation: Repair curb rash, scratches, and bubbling clear coat on aluminum rims by wet-sanding through 120 grit to 2000 grit, stripping the clear coat with chemical stripper, polishing, and then applying a UV-resistant clear coat. The video shows this as a complete DIY restoration that leaves the rim smooth, shiny, and protected, and it can be done at home for relatively little cost.
Key Points
- Keep the tire mounted, but remove the rim from the car and pop out the center cap before starting.
- Use a rotary tool with a flat disc to remove deep scratches and curb rash, since the clear coat still protects the aluminum underneath if you sand too far.
- Chemical stripper is the most tedious step: it may take two coats plus abrasive sponge work to remove all clear coat, and any leftover clear coat must be fully removed.
- Polish with a foam polisher attached to a drill, applying polish to the cone first and working it in at slow speed.
- Protect the finish with three medium-thickness coats of a UV-resistant, non-yellowing clear gloss, masking the tire with note cards.
Details Worth Noting
Concrete instructions:
-
Remove the center cap by tapping it outward (for most cars).
-
Clean the rim with soapy water (dish soap and water) and dry it completely before stripping.
-
Sand deep scratches with a rotary tool using a flat disc (the video uses 120 grit, though the speaker says about 200 grit is better), keeping the tool moving at roughly 10,000 to 20,000 RPM across a wide area so you do not create a divot or waves. Wear safety glasses and a dust-protective mask.
-
Wet-sand with wet/dry sandpaper and soapy water in this order: 400, 600, 1000, then 2000 grit, using random circular motions at medium pressure. Stay on deep scratches with 400 grit until they are gone; if you miss any spot after 2000 grit, re-sand only that area starting at 400 grit.
-
Apply chemical stripper with a sponge brush (from a spray bottle), coating thickly and avoiding the tire. Let it sit about an hour until the clear coat bubbles, then neutralize, rub with an abrasive sponge, hose off, and repeat if needed.
-
Buff with metal polish suitable for aluminum, using the foam polisher on a drill, then wipe off by hand with microfiber.
-
Degrease with rubbing alcohol using gloves, let it evaporate, and mask the tire with note cards slipped between the rim and tire (tape often does not stick to tires). Tape off the valve stem.
-
Spray three medium coats of clear gloss, moving around the wheel for full coverage, starting and stopping spraying off the rim, and waiting about five minutes between coats. Remove the note cards before the paint dries, and allow a few hours to dry.
-
The speaker's aim is for the whole rim to look like the "after" image, with the curb rash removed and the clear coat restored.
-
The clear coat left on the aluminum acts as a protectant, so the speaker recommends stopping the rotary-tool work before the clear coat is fully removed.
-
Chemical stripper should not contact skin or tires; the speaker recommends wearing protection and wiping off any contact on tires immediately.
-
The video shows the process on a multi-spoke rim, and at the end the speaker reinstalls a Cadillac center cap, emphasizing thorough coverage due to all the spokes.
-
The speaker says the process is inexpensive and can be done at home, though specific costs are not given.
Bottom Line
Restoring damaged aluminum rims is a manageable home project if you follow the sanding, stripping, polishing, and clear-coating sequence carefully, with the stripper step being the most tedious.


